
STRENGTH TRAINING FOR ADULTS
Twice weekly strength training
You can read more on the benefits of strength training in my blog- 'Hurry-up and weight'
Progression of strength training
In order to stimulate change in the number and size of muscle cells you must increase the resistance/weight that you lift, or the number of times the weight is lifted (repetitions) every one-two weeks.
To begin, if using a weights machine and not an exercise band, I measure what weight the patient can lift ten times, but no more. This might be 10kg.
I then prescribe two sets of 5 reps (repetitions) followed by the maximum repetitions that the patient can lift to almost exhaustion on the third set i.e. 5 reps, 5 reps, and then you should be able do 10 reps. Remember to take a 2 minute break between sets. The reason for starting at 5 reps is to check you posture is good and that you have good technique. (See table 1. below- this number is in bold italics)
For session two of week one (greater than 48 hrs later) I then prescribe three sets of 10 repetitions.
On week two the patient again lifts the weight as many times as possible on the third set i.e. 10 reps,10 reps and then they might lift 16. Once the repetitions go above 25 the weight should be increased to the next level e.g. increased from 10kg to 15kg. This will depend on the maching you are using as to how the weight increases. (See table 1. below)
The example below is a gentle introduction to lifting weights and helps ensure good posture and control while performing the exercise.
Table 1. An example of how strength training may be progressed.
Repetitions (Reps)
For older patients or anyone new to strength training I recommend starting with a weight that you can lift between 15 and 20 times before reaching exhaustion. This means you are more likely to avoid injury, but will also accustom your body to the exercise, while performing the movement correctly.
If you do not increase the weight lifted but only increase the repetitions e.g. you are easily lifting a weight 30 or 45 times, the exercise is no longer pure strength training but becomes a form of aerobic or endurance exercise. You therefore need to increase the weight which will result in a decrease in repetitions.
Rest between sets
Take a break for 120 seconds between sets when lifting or pushing weights on a pulley. You can reduce this to 60 seconds for sit-ups exercises with a theraband.
For the wall squat, divide the sets up by doing another exercise in between each set.
There are many different methods for progressing exercise, I have found the example described in table 1. works best to avoid injury and ensure that the muscle is being challenged appropriately.
Posture
Remember to do the exercise slowly, while maintaining good posture. Keep the shoulder blades back and down towards the back pockets of your jeans. Maintain a straight spin with the chin slightly tucked in as if holding an apple between your chest and chin. Activate your stomach muscles so that you have to tuck your tailbone inwards.
Breathing
Remember to breath-in before lifting any weight including your own body weight. Then, when you are ready to lift or push, breathe out slowly. This is very important as it affects the pressure inside your lungs and abdomen, and also affects the strength that you generate. Ask anyone who rows.
1. Chest press on a machine
If you don’t have access to a gym a wall press-up is just as good; however, if you have Rheumatoid Arthritis affecting the wrist, or carpel tunnel, you can avoid direct pressure on the wrist by using a Theraband to perform a similar exercise (details to come)
If doing the chest press on a pulley system in a gym use table 1 above.
If doing the wall push-up use table 2.
For any of these exercises always position your shoulder blades in a backward and downward direction, keep your spine straight and your stomach muscles activated or drawn inwards. Then, when you are ready- breath in. As you breath out, push the weight away from your chest. Breath in again, as your arms return back to your chest.
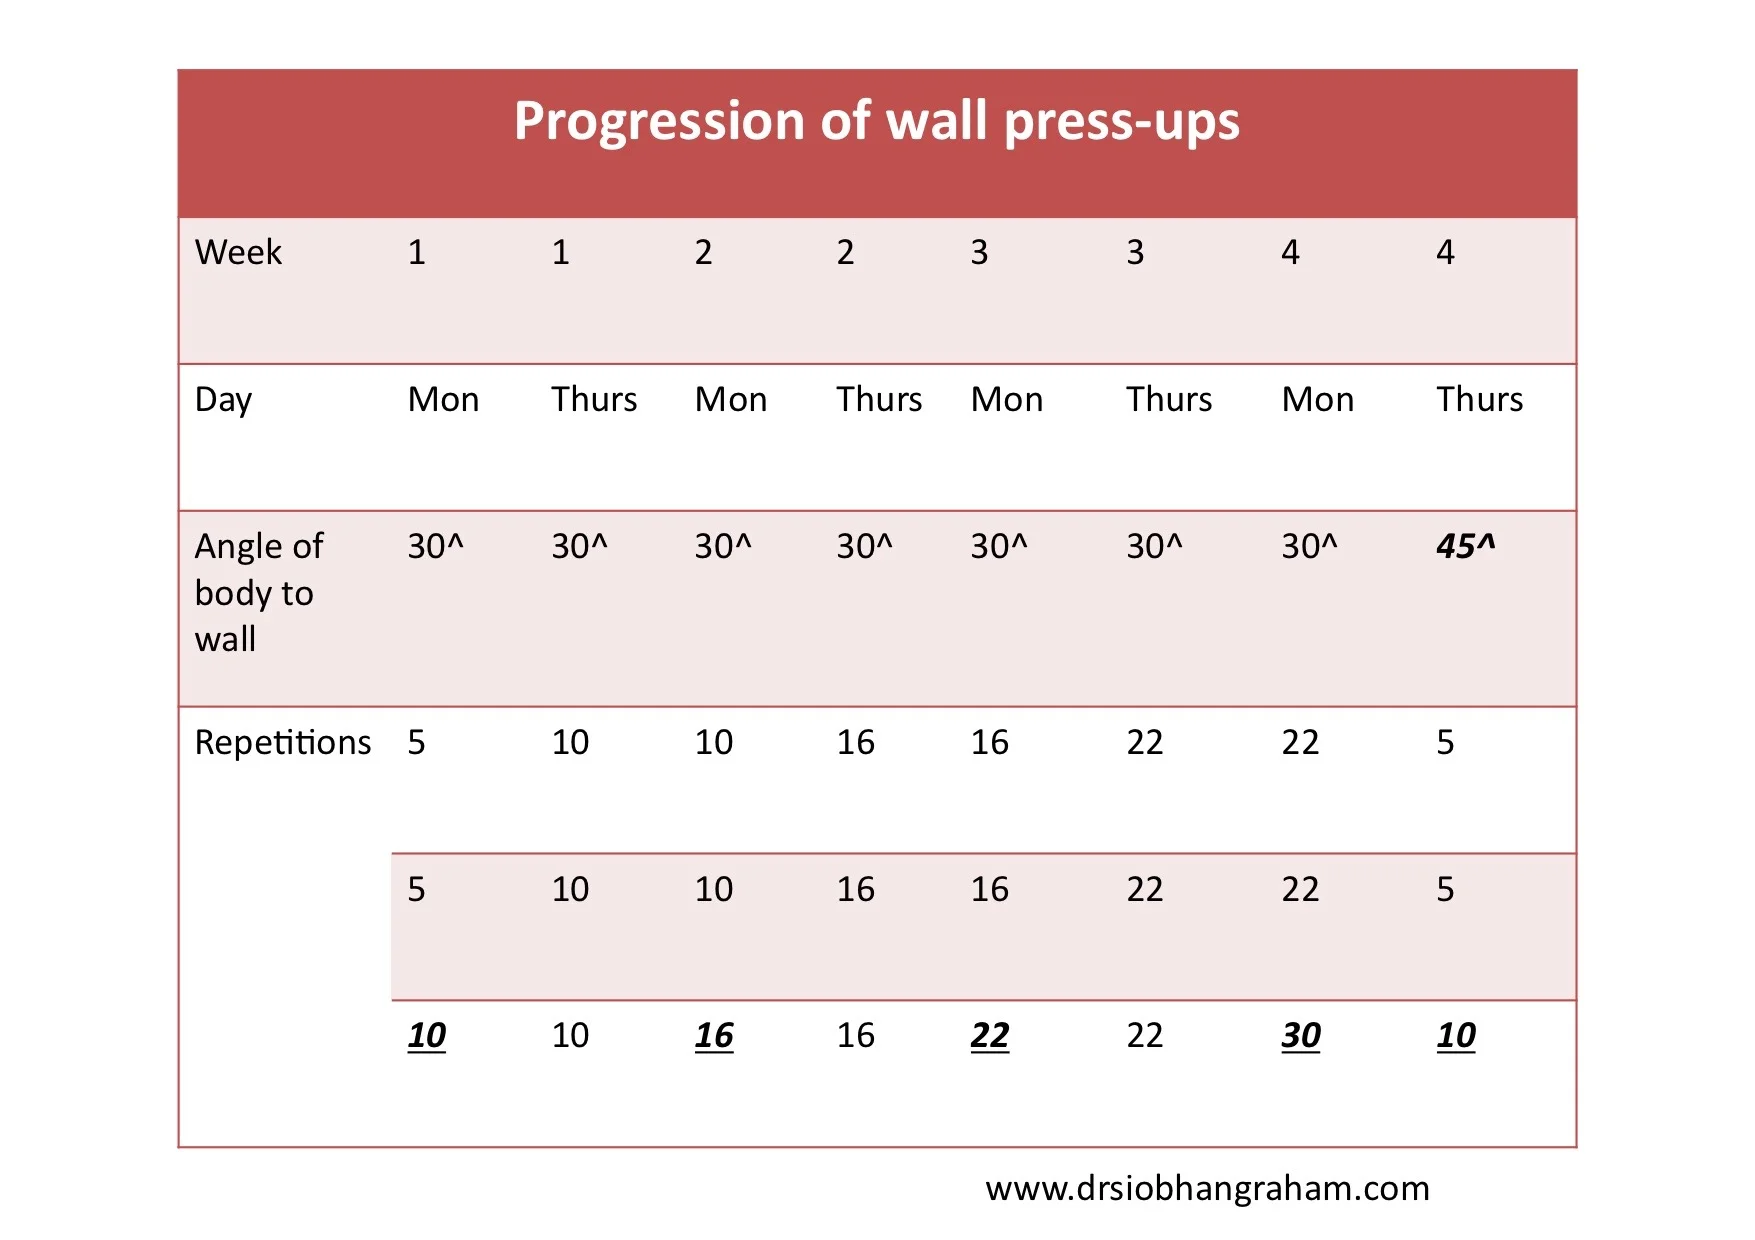
Table 2. Once you have exceeded 25 repetitions then increase the angle to the wall and start again with a low number of repetitions.
2. Wall squat
Place your feet out 30-50 cm from the wall, then sit back so that your back is against the wall and you are in semi-seated position see diagram. Make sure your knees at vertically above your ankles, if needed either move your feet out from the wall further or sit up more.
This is a timed static strength exercise. It’s easy to begin with 30 seconds. Then take a break, go and do another exercise and come back to do a second set which you should hold for as long as possible i.e. 30 seconds for set one, then you might be able to hold the second set for 40 seconds.
At the next training session you begin with two sets of 40 seconds. We can only progress this exercise by increasing the time we hold it for. But sometimes you may start in a more ‘open hip position- see diagram- and after 4-6 weeks you may want to lower your hips down so that hip joints are at 90 degrees. This is not possible for everyone and you should only feel ‘burning’ in your thigh muscle (quadriceps).
Table 3. Progression of Wall-squats using time in seconds (secs).
3. Modified abdominal crunch (Sit-up):
Lie down in bed with, or with out a pillow to support your head. Place your arms crossed on your chest and have your legs bent so that your feet are flat on the bed. Then raise your chest and shoulders-if possible- upwards. Once you feel your stomach muscles contract, lower shoulders back down gently and repeat until exhaustion.
YOu may be able to 10 or you may be able to do 20. Take a rest and try and repeat the same number again. That means two sets of 10 sit-ups ( 2 x10). try two sets for the first 2-3 weeks then increase this up to three sets if you have time.
Remember to look upwards at 45 degrees, to avoid over bending or flexing your neck.
Only the smallest movement is required to work the stomach muscles. This exercise is progressed by increasing the number of sit-ups every 2 weeks or performing the motion a little slower.
Once you can do three sets of 25 you have reached an adequate strength and can continue like this.
4. Low row
This can be done with an elastic band if you don’t have access to a multi- gym machine. Make sure that you position your shoulder blades backwards and down towards the pockets of your jeans before commencing.
Only use your shoulders and arms to pull the band horizontally backwards. Try not to use your body weight to lean backwards, as you will not build muscle around the shoulder blade muscles if you do that. Start with the easiest resistance band-usually Yellow. Once you have exceeded 25 repetitions then change band to next higher resistance- usually green- and start again with 5 repetitions as detailed in the table 4 below.
Table 4. Progression of exercises using an exercise band (Theraband)
5. Leg-extension
Again use a multi gym machine or an exercise band as in the picture. When extending your leg make-sure you have already inhaled and are about to exhale as you extend the leg. Observe your leg and make sure it is straight and not turned inwards. An easy way to do this is watch your foot, if the toes are falling into the mid-line then your knee may be rotated inwards. Always work with-in a pain-free range of movement. This means if it is sore to fully extend your leg, or maybe you cannot do this, then only go as far as is possible.
The exercise- band is looped around one leg of a sturdy chair and one of your legs (You can tie in a double knot). When ready extend the leg forwards, putting tension on the band, as far as you can go then return to the starting position. If this is too easy you will have to make band length shorter. See table 4. for an example of how to progress this exercise if using a Theraband, or table 1. if using a weights machine.
After eight weeks
Everyone progresses at their own speed. After 8-12 weeks you may reach a steady training state, where you no longer want to progress the exercise i.e you may be able to perform 30 abdominal crunches and do want to spend more time at this; this is absolutely fine. A good general sign of fitness is being able to perform 25 slow and controlled abdominal crunches.
Stretching
Remember to stretch all the large muscles after each workout and have a large glass of water. I also recommend green tea as a natural anti-oxidant.
Pain
You should always exercise with-in a pain-free range of motion. It is abnormal to experience pain while lifting or pulling weights.
After training, your muscles will be sore for 2-3 days. Try and stretch every day for five to ten minutes when you wake-up and drink enough water to stay hydrated.
If you are already experiencing pain in a joint then always speak to a sports doctor or physical therapist who can advice you on how to modify your workout.